Wednesday, December 22, 2010

Black-Sugar Trifecta, Wrapped Chip Cookies (Twice-Baked)


[ Equipment: oven and dehydrator or slow cooker with temperature control. For more information about the terminology in this recipe, see Low Temperature Baking: A Journey of 3 Paths ].

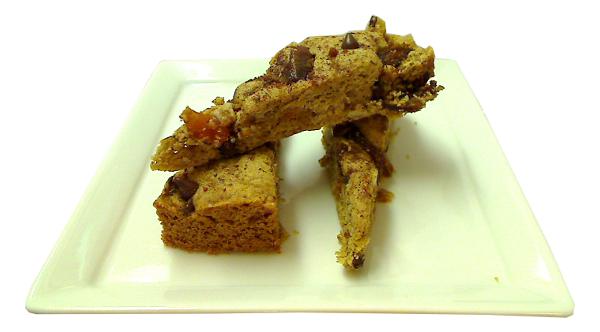
With the year-end holidays approaching, I thought it appropriate to post a recipe for a VaporBaker chocolate chip cookie (not counting the Chocolate Almond Meringue Spiral Cookies, which are really incognito macarons). After several weeks of recipe testing, these cookies didn't turn out as simple as originally intended, but they are made of everyday ingredients - none of them new to the world of chocolate chippers - revived through the techniques of ingredient construction. Each chipper presents jumble of textures and flavors: by turns soft, crisp, moist, sandy, candy crunchy and chewy, perfumed with exotic flavors, faintly fruity, faintly smokey, with bursts of chocolate, the interaction among chocolate dates and apricots, harvest oatmeal, walnuts and intensified black sugar and all capped with a pebbly crust of spicy black-vanilla white sugar.

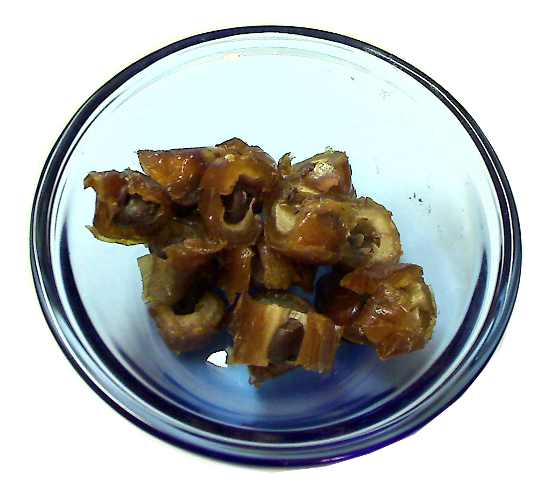
An explanation of the title: the "wrapped chips" refer to individual chocolate chips stuffed in a date surround. "Trifecta" refers to the trifold composition and purposes of the black sugar. The sugar is forged from 3 ingredients: natural dark brown sugar, molasses and dates, and deployed in 3 ways: as a primary sweetener, a binder for the granola and as a flavorful topping.

These are twice-baked cookies, once in a slow oven and once in a dehydration oven, like a biscotti but more delicate, a wonderful eating experience. My only regret is that they are so labor intensive I cannot make them too often. The prep time for the dough alone from scratch demands 2 days (a lot of it is waiting time). Plus, oven time (first and second bakings) can stretch up to a full day more.

Speaking of black sugar, the actual flavor inspiration for this recipe came from a vintage recipe for chocolate caramels, first published in 1881. It was reprinted in the New York Times Recipe Redux column in February 2010. The 6 ingredients (butter, chopped chocolate, milk, sugar, vanilla and molasses) are same for basic chocolate chip cookies, minus the flour and egg. The chefs in that column re-imagined the ingredients into a dessert called Black-Sugar-Glazed Medjool Dates With Pecorino and Walnuts. It was the discussion of these recipes that got me to thinking about ways to incorporate black sugar into a chocolate chip cookie.

I approached this recipe as an opportunity to make a different chocolate chip cookie with ordinary cookie ingredients, but constructed into various forms for the different flavors and textures. The concept is: the whole is different from the sum of its parts. For example, the dehydrated molasses sugar (an intermediate step in the making of black sugar) tastes something like Chinese block sugar (an unrefined sugar), not the same as before dehydration. Another constructed ingredient is the black-sugar granola, which is dried until rock-hard to resist blending into the dough. I wanted granola chunks in the cookie, not oatmeal-chocolate chip cookies. The wrapped chips explode a chocolate and date medley when chewed, distinct from the free-floating chips in the cookie. Constructive activity tallies the prep time, but changes ordinary ingredients into new foods.

The Constructed Ingredients and Substitutions

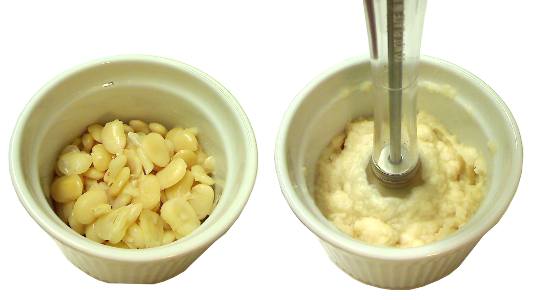
The powdered black sugar, black sugar granola and date sugar are all fabricated with the help of a food dehydrator or dehydration oven set at around 130°F. The temperature is higher than my usual limit of 120°F. However, the cookies slow-bake anyway at 250°F, and the higher drying temperature balances preservation of flavors with expeditiousness.

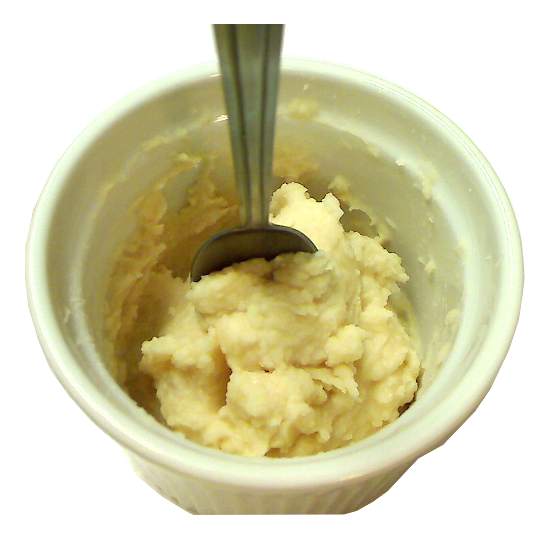
The base ingredients for the black sugar (dark brown sugar, molasses and date sugar) should be of high quality. Pure cane dark brown sugar is said to be brown all the way through (as opposed to being white sugar lightly coated in molasses). I bought an unsulphured "first" molasses (Grandma's brand) for my food bin, but stronger unsulphured grades would be fine too. I made date sugar by dehydrating and grounding dried Deglet Noor dates (also sold in markets near me as "California dates"). Medjools taste sweeter, but their higher water content would mean more time in the dehydrator. In general, dried dates for eating would turn to paste in a grinder, and must be dehydrated before grinding into date sugar.

Although sugar of one form or another pops up everywhere in the cookies (the "trifecta" of black sugar), they're only mildly sweet, which is my taste preference. In earlier batches, I did feel a need for more punch in the sweetness. Towards that goal, I mix a small amount of white vanilla sugar into the topping (1 to 1 ratio with the black sugar) and sprinkle over the cookies before baking. The topping method adds the white sugar punch with fewer calories.

The granola should be dry and very pebbly, about 1/4 to 3/8-inch chunks, so that they hold onto their individual character when mixed into the cookie dough. To construct the granola with a robust binder that doesn't crumble when mixed into dough, I add almond meal, which combines with the molasses to form a paste that dries into a granola mortar. The recipe makes about 3/4 cup. 1/2 cup goes into the dough. I munch on the remaining 1/4 cup while making the cookies.

I make the wrapped chips by stuffing dates with chocolate chips and slicing them into individually wrapped chips. Again, I prefer the Deglet Noor dates, being smaller and drier, to the Medjools for this purpose. Dates that were pitted without splitting hold the chips more securely. Although Medjool-wrapped chips would be very tasty too, and sweeter, the chips don't fit snuggly into those larger fruits.

The long and involved preparation of the constructed ingredients for these cookies can be a trial of patience (it has been for me), but there are good shortcuts. A mixture of commercial dark sugars, such as a granulated dark muscovado and prepared date sugars, ground to powder, would be a fine substitute for the composite black sugar. However, few American markets stock them. Where they are available, they are usually too wet and must be dried out for a few hours. The homemade black sugar has a higher concentration of molasses than dark muscovado (25% vs. 13% if my math is correct), so the substitutions may not taste as intense.

There are a very few commercial molasses granolas, but none that I could find with only apricots. A fruitless molasses granola or granola cereal, enhanced with chopped apricots, would be a good substitute for the homemade black-sugar granola. Packaged date sugar is more widely available. If the date sugar is coarsely ground, it should be re-ground to a fine powder.

I introduced the homemade baker's 5-spice blend in my 5-spice oatmeal cran-raisin cookies. Substitute with Penzey's baking spice. Some of these conveniences are a tiny bit pricey. Date sugar sells around $5 US per pound. Dark muscovado sugar can run from $5 to $10 US per pound.

Other Ingredients and Baking Tips

The apple fiber aids with moisture retention in the cookie and adds fruity tones and even dietary fiber, but does not significantly hydrate the dough as applesauce would. Although the cookies are twice-baked, the apple fiber holds onto a wisps of moisture over the course of the second baking, for a barely-there inner softness. With extreme drying from the second baking, however, the cookies assume a candy-like crunch, to which the apple fiber definitely contributes. The apple fiber is separated from applesauce by draining the juice. Dehydrating the applesauce would leave the fiber with overly-assertive apple flavor.

Coffee bean powder is canned ground coffee (I used a Folger's medium roast) that's been further ground in a coffee grinder into a VERY fine powder. It must be VERY fine, or the cookies will taste gritty. In this recipe, the coffee bean powder enhances the flavor of the chocolate chips and the black sugar. Espresso powder (which is brewed, dried and then bottled coffee grinds) will also work.

Be careful not to overbake the cookies (they overbake very easily), because the heat can harm the delicate flavors, not to mention the overpowering taste of burnt dough. In the first baking, the cookies are ready when the edges touching the sides of the pan are LIGHTLY brown. They emerge from the first baking a little cakey and moist. They can be served after the first baking, but (in my opinion) attain apotheosis after the second baking, when the crisper delicate texture unveils the subtler flavors.

The second baking takes place under dehydration temperatures because the cookies will burn if they continue to bake in a slow oven and because dehydration preserves flavors. I specify a dehydration temperature range of 120 to 140°F (49 to 60°C). Although most of the enzymes in the ingredients have been deactivated during the slow-baking, flavors are still temperature sensitive. Just-moist cookies (hard on the outside, softer on the inside) are delicious, but I adore them very brittle-crisp or "bone dry" (dried for about 20 hours at 140°F/60°C). Anticipate this second baking to last anywhere from several hours to almost a full day.

The 16 cookie yield may seem to be a stretch, but somehow it feels right. Each 1/16th of the pan biscuit tastes like a full cookie in its own right: packed with flavor and is a satisfying taste experience. I feel this to be true each time I eat one.

Makes 16 cookies
- 90 calories per cookie
- Oven Temperature: 250°F/121°C

Cookies:
  • 1/4 cup powdered black sugar (see below)
  • 3 tablespoons butter
  • 2 teaspoons apple fiber (see text)
  • 1/4 teaspoon vanilla extract
  • 1/2 beaten egg (2 tablespoons)
  • 3/4 cup all-purpose flour
  • 1/4 teaspoon baking powder (see text)
  • 1/4 teaspoon baking soda
  • pinch of salt
  • 1/8 teaspoon coffee bean powder (see text)
  • 1/2 teaspoon baker's 5-spice (see text)
  • 1/4 teaspoon dried lemon zest
  • 1 tablespoon mini chocolate chips
  • 1/2 cup black sugar granola (see below)
Topping:
  • 1/2 teaspoon vanilla sugar
  • 1/2 teaspoon black sugar (see below)
  • 1/4 teaspoon baker's 5-spice
Powdered Black Sugar (makes about 3/8 cup):
  • 1/4 cup dark brown sugar, packed
  • 1 tablespoon unsulfured molasses
  • 4 dried dates, chopped (see below)
Apple Fiber (makes about 2 teaspoons):
  • 1/8 cup unsweetened applesauce
Date Wrapped Chocolate Chips (makes 21):
  • 7 dried dates (Deglet Noor, about 1-1/2 inches in size - see text)
  • 21 regular-size chocolate chips
Black Sugar Apricot Granola (makes about 2/3 cup):
  • 1/4 cup rolled oats
  • 1/4 cup chopped walnuts
  • 2 teaspoons finely ground almonds or almond meal
  • pinch of salt
  • 2 tablespoons chopped, dried apricot (about 3 dried apricots)
  • 3-1/2 teaspoons unsulphured molasses
  • 1/8 teaspoon baker's 5-spice
Powdered Black Sugar Method:


1. Put brown sugar and molasses in a small bowl and toss-mix with a fork, breaking up any lumps. The texture of the sugar should be very granular.


2. Dehydrate the sugar for 12 hours at 130°F/54°C until completely dry. In a commercial dehydrator, follow the manufacturer's instructions. In a converted slow-cooker with temperature control, pour the granola into a wide, greased bowl and spread it out. Place the bowl in the cooker on a trivet.


3. To speed up the drying, every 3 hours, remove from dehydrator and gently pound the sugar flat with pestle to crush the sugar crystals. Then fluff it with a fork. Replace in dehydrator and continue drying. The sugar is ready when the surface has lightened and hardened. If the air is very humid, it may take more time in the dehydrator to reach this stage.


4. Unless the chopped dates are rock hard, they contain excess water and will grind to a paste. Dehydrate them for 24 hours at 130°F/54°C until completely dry. With a commercial dehydrator, follow the manufacturer's instructions. In a converted slow-cooker with temperature control, put the chopped dates in a small pan or dish and place on a trivet in the cooker. The dates and molasses sugar can be dehydrated together at the same time, in the same cooker.


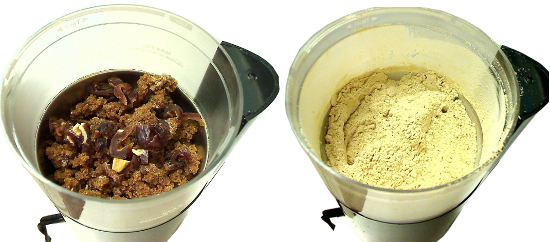
4. Break up the hardened molasses sugar into small chunks. Put the molasses sugar in a coffee or spice grinder with the dried dates. Grind until the mixture is a fine powder.


5. Store in an airtight container until ready for use.

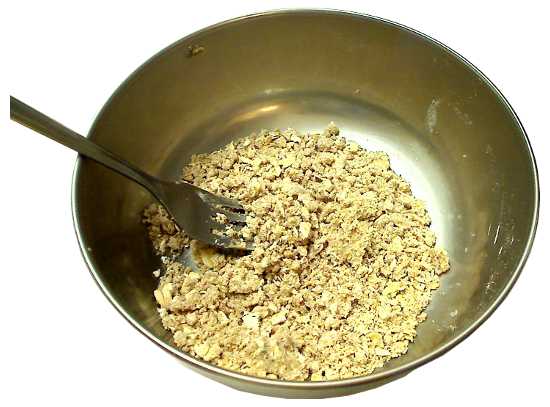
Black Sugar Apricot Granola Method:


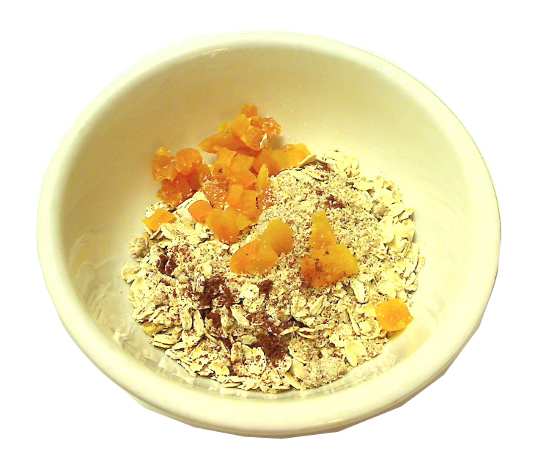
1. Mix oats, walnuts, apricots and almond meal in a small bowl.


2. Mix in molasses until the dry ingredients are evenly coated.


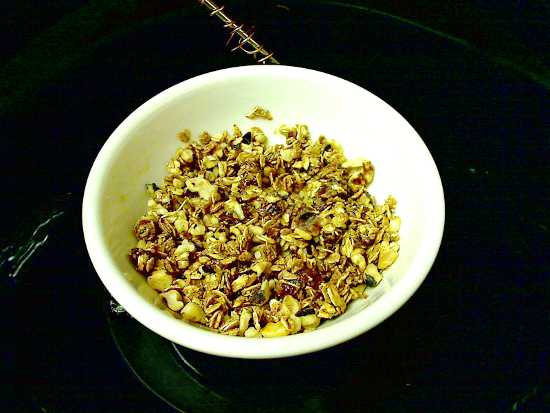
5. Pour into a greased dish. Dehydrate the granola for about 8 hours at 130°F/54°C or until granola is completely dried and hard. For a commercial dehydrator, follow the manufacturer's instructions. For a converted slow-cooker with temperature control, transfer the granola to a wide dish and spread it out to dry faster. Put a trivet in the cooker and sit the dish on it.


6. GENTLY break granola into large chunks. Store granola in an airtight container until ready to use.

Wrapped Chips Method:


1. Stuff each date with chocolate chips. I can usually fit 3 chips per date. In the picture above, the dates were sold already slit along the side. Try and get dates that are not slit, because they will hold the chips more securely.


2. Slice the dates into individual date-wrapped chips.


Apple Fiber Method:


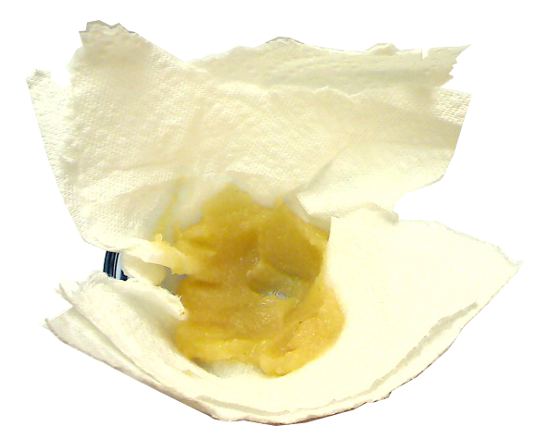
1. Line a small sieve with two layers of paper towels. Spread the applesauce over the towels and allow to drain for about 1 hour.

2. Fold up the towels around the applesauce and GENTLY squeeze out any excess juice in the applesauce.


3. Open the towels and scape out the apple fiber with a spoon. With my brand of applesauce, 1/8 cup of applesauce reduced to about 2 teaspoons of apple fiber.

Cookie Method:


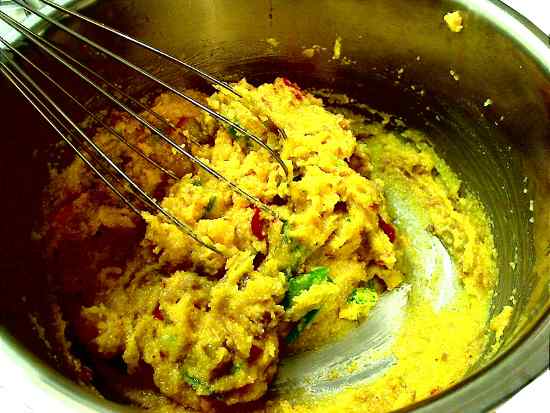
1. In a small bowl, thoroughly whisk flour, baking powder, baking soda, baker's 5-spice, coffee bean powder, lemon zest and salt. Set aside.


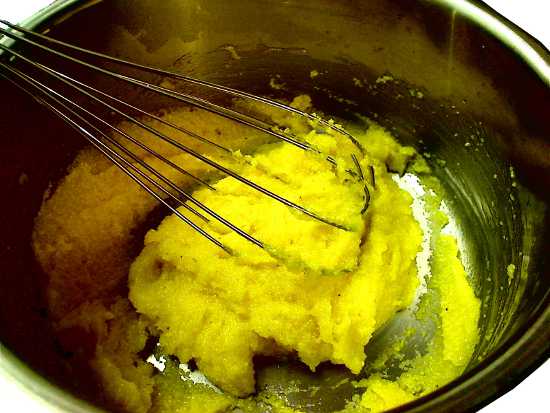
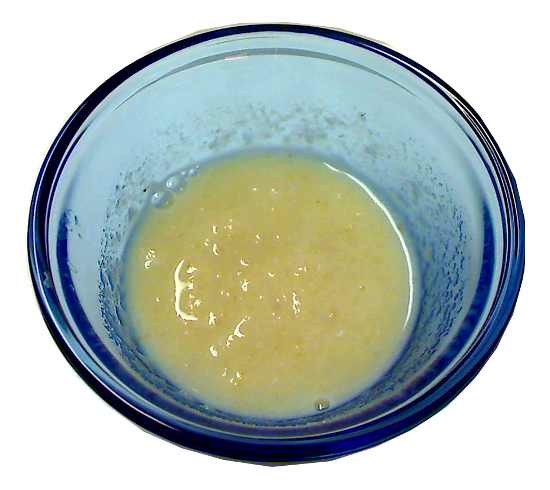
2. In a large bowl, cream softened butter and granulated black sugar with a fork until well combined.


3. Add 2 tablespoons of beaten egg, vanilla extract and apple fiber and beat until light and fluffy.


4. Add flour in portions, mixing with the whisk and then a wood spoon and then kneading (if necessary) in the final portions of flour to form a SOFT, non-sticky dough. If needed, add 1 or 2 teaspoons more flour to achieve a good consistency.


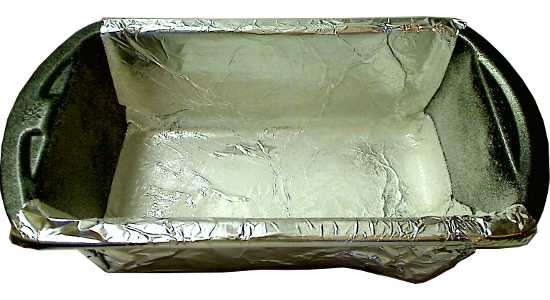
5. Grease a 7-inch springform pan or cake pan with removable bottom. Cut out a 7-inch diameter circle from wax paper or parchment paper and place in bottom of pan. Grease the top of the paper.


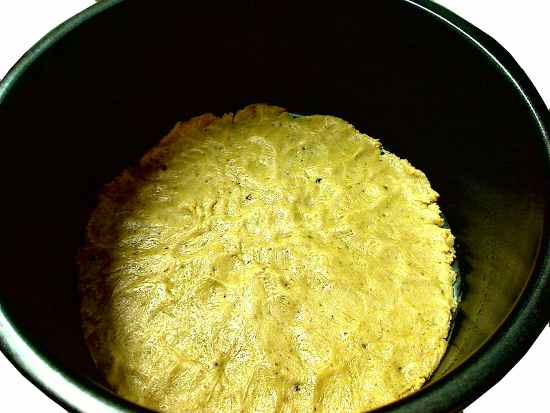
6. Divide the dough in half. Break off pieces from one portion of the dough, and pat them evenly onto bottom of pan.


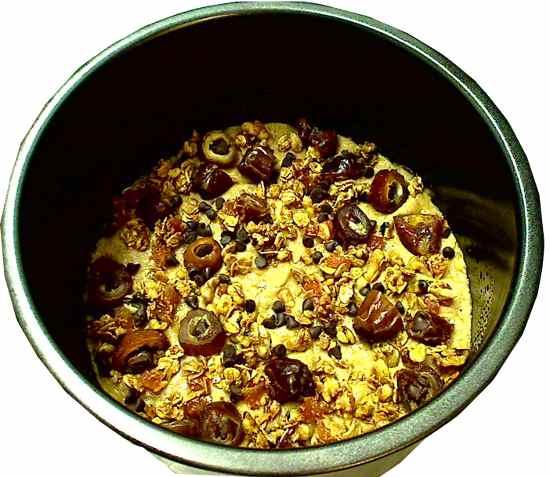
7. Break granola into chunks to about 1/4-inch or a little larger and sprinkle evenly over the dough - but leave an area at the center clear (a circle of about 1-inch diameter) for easier cutting later. Then sprinkle the wrapped chocolate chips and 2 teaspoons of the mini chocolate chips evenly over the dough - again leave the area at the center clear. Gently press the granola and chips into the dough. Be careful not to crush the granola or unwrap the chocolate chips, so that they retain their individual characteristics within the cookie.


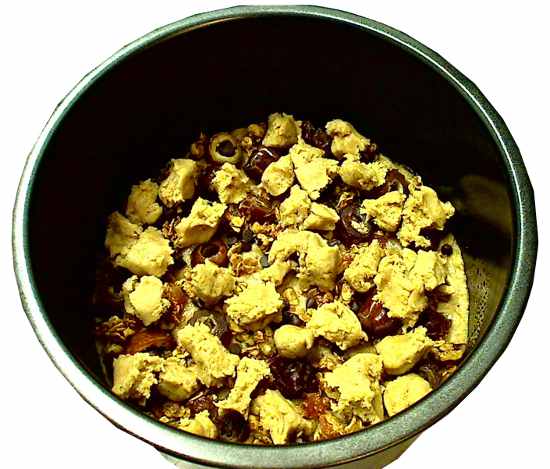
8. Break off pieces from the remaining portion of dough, and distribute them evenly in the pan.


9. Press the dough pieces flat to completely cover the granola and chips. Allow some of the granola and chips to peek through the dough top layer.


10. Sprinkle the remaining 1 teaspoon of mini chocolate chips over the dough and press them slightly into the dough to secure them. Then mix the topping ingredients in a small dish and sprinkle evenly over the top of the dough.


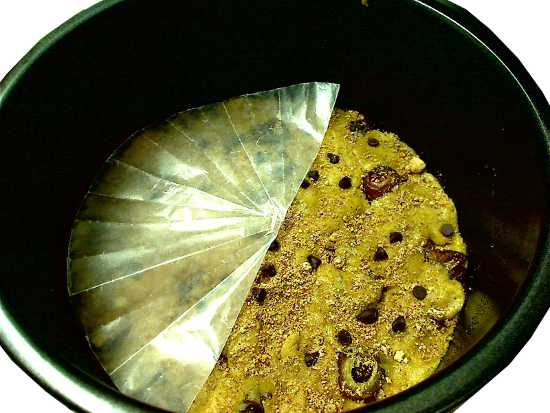
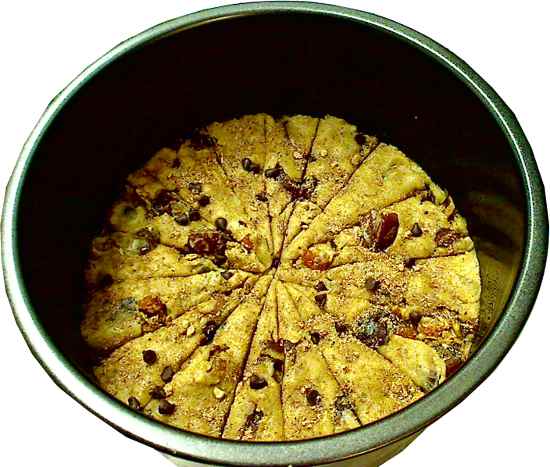
11. Score the dough with a knife or flat-bladed dough scraper into 16 wedges. The scoring should go through the thickness of the dough. Cut templates from wax paper to aid accurate scoring.


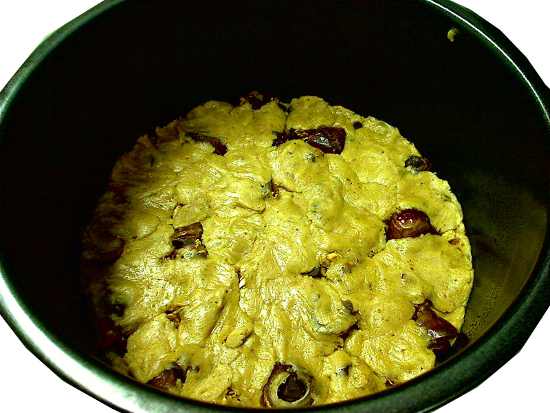
12. Bake for 40 to 45 minutes or just until the edges touching the pan are a VERY light golden brown. Do NOT overbake or the cookies will have a burnt taste. Cool for 10 minutes in pan. Unmold and continue cooling on a rack. With a knife, press down into score marks on the cookies to separate them.


10. For the second baking, put the cookies in a food dehydrator or dehydration oven set in the range of 120 to 140°F (49 to 60°C) and dry them for several hours or overnight until they are crisp and crumbly or to desired degree of crispness.

Brisa Del Mar Tamale Muffins With Lima Bean Frosting (Baked)


These muffins are basically tamale pies baked in muffin form with a center filling. They are "brisa del mar" ("sea breeze") because they have a hint of sea flavor. Although traditional tamale pie frugally extends a meat ingredient (usually beef), this recipe can be made vegetarian or vegan. The main deviations from basic tamale pie are the ground shrimp (or seaweed flakes) in the cornmeal batter, the "frosting" of pureed lima beans, and the smokey paprika, which reminds me of barbecue. Like the zong-zi wrapped rice dumplings, these muffins are just about a complete meal in one package. Once the cornmeal solidifies, they can be handled without breaking apart, and can be put in a cupcake carrier and stowed in lunchboxes (with the salsa in a separate sauce container or in packets - like the fastfood ones - instead of garnishing the frosting).

As I was developing this recipe, it occurred to me that flavoring the cornmeal with seafood would be an interesting touch, since I live in a city with a seafood waterfront. Large chunks of fish or shrimp would have been too bold, I thought. In my food bins was an unopened bag of dried ground shrimp (shrimp powder), perfect for a scent of seafood. Shrimp powder has a slightly bitter taste to it (at least my brand does), so I don't recommend loading the cornmeal heavily with shrimp powder.

The "fiesta" frozen vegetables are a mix of carrots, broccoli, sweet peas, white beans. garbonzo beans, kidney beans, green beans and red peppers. With so many kinds of beans, I included cumin and smoked paprika in the spice mix to make the meat mixture taste more like a barbecued chili. I did try a frozen "stir-fry" mix as well (with such asian-style vegetables as water chestnuts, mung bean sprouts and snap peas), but found the asian flavors clashed with the TexMex flavors too much for my palette.

The frosting was originally supposed to be mashed potatoes, but I went with pureed lima beans when I discovered how close they were to real mashed potatoes (many of my bun and pastry fillings are based with lima bean puree). Thematically, the lima bean puree echoed the bean ingredients in the batter. The recipe makes more puree than absolutely necessary for frosting the muffins, but I like a thick layer of frosting on my tamale muffins.

For vegetarians, these muffins can be made meat-free by substituting the ground beef with crumbled veggie burgers or a prepared vegetarian textured protein (I tried the Morningstar Crumbles with great success). Instead of the shrimp powder, put in 1-1/2 to 2 teaspoons (roughly double the amount) of seaweed flakes. Seaweed flakes are available in American markets, but I made my own flakes by roughly grinding half a sheet of a sushi wrapper (sushi nori) in a spice grinder or by cutting it into confetti with a scissors. I haven't tried a vegan cheese, but there are cheddar-like vegan cheeses that melt like a dairy cheddar.

Makes 4 tamale muffins

- 130 to 190 calories per muffin (frosted with 1 tablespoon of lima bean puree)
- Oven Temperature: 250F/121C

Tamale Muffins:
  • 1/2 cup browned ground beef or vegetarian crumbles
  • 1/4 cup chopped green salad olives
  • 1/4 cup frozen "fiesta" vegetables, thawed (see text)
  • 1/8 cup chunky-style salsa
  • 1 tablespoon ketchup
  • 1/4 teaspoon salt
  • 1/2 teaspoon chili powder
  • 1/4 teaspoon smoked paprika (see text)
  • 1/8 teaspoon cumin (see text)
  • 1/4 teaspoon hot sauce
  • 1/8 cup grated cheddar cheese or other soft cheese or vegan melting cheese (see text)
  • 3/8 cup yellow cornmeal
  • 1-1/4 cup water
  • 1 teaspoon dried ground shrimp or 2 teaspoons seaweed flakes (see text)
  • 1 cup seasoned lima bean puree (see below)
Lima Bean Puree (makes about 1/2 cup)
  • 1/2 cup dried baby lima beans
  • salt and pepper to taste
Pureed Lima Beans Method:

1. Soak lima beans in water overnight.

2. Drain beans. Put in sauce pot and cover with water. Simmer for about an hour or until beans are tender.


3. Drain and puree beans in a mini food processor or with an immersion blender.


4. Season puree with salt and chili powder or pepper to taste.

Cookies Method:

Preheat oven or cooker to 250F/121C.


1. Mix ground beef or vegetarian crumbles, vegetables and olives in a small bowl. Gently press mixture and pour out any excess liquid.


2. Add salsa, ketchup, hot sauce, spices, salt and cheese and mix. Set aside.


3. In a medium sauce pot, mix water, cornmeal and dried ground shrimp or seaweed flakes. On medium heat, stirring constantly with a whisk, cook the corn meal until it thickens into a paste and clears the bottom of the pot as it's stirred (usually less than 5 minutes).


4. Remove from heat. Reserving 1/4 cup of meat mixture (muffin filling), stir the remainder of the meat mixture into the cornmeal.


5. Grease 4 muffin molds (1/2 cup capacity). Fill each muffin mold with the cornmeal batter.


6. With a spoon, press a deep hole into the center of each muffin.


7. Put 1 tablespoon of the reserved meat mixture into the center of each muffin and press down until just below level of the mold.


8. Spread the cornmeal mixture from around the muffin to cover the fillling.


9. Optional: sprinkle the top of each muffin with grated cheese. Muffins that will be frosted with lima bean puree don't need the cheese topping, which will toughen or harden as the muffin cools.


10. Bake for 2 to 3 hours until the muffins are firm and the cheese is melted and lightly brown. Interestingly, if the muffins are refrigerated for several hours before baking, they may brown in as little as 1-1/2 hours, possibly because more water is absorbed into the cornmeal during the refrigeration. As is true of a corn pudding, the longer the muffins are baked, the more the cornmeal softens and smooths out. If baking in a cooker, place moisture absorbing paper towels under lid.

11. Remove muffins from oven and cool for at least 45 minutes. If they aren't cooled long enough, the muffins won't hold their shape when unmolded.


12. Unmold each muffin and stand upright.


13. Frost each muffin with lima bean puree. If the muffins will be served hot, reheat them in a steamer or wrap them in a wet towel and reheat in the microwave, before garnishing them with salsa in the next step.


14. Just before serving, top each muffin with a spoonful of salsa.


15. An alternative way to serve is to put the muffin in a bowl and add a serving of vegetables, salsa and lima bean puree.

Cinnamon Basil Crumb Cake (Steamed)


[ Equipment: steamer or steam oven. For more information about the terminology in this recipe, see Low Temperature Baking: A Journey of 3 Paths ].

The title of this recipe is not a typo: it's really a steamed crumb cake. Crumb cakes are usually baked in dry heat, because the topping is supposed to be dry and crumbly. On this cake, the topping is crumbly but moist, similar to those on the individually wrapped coffee cakes sold in delis and convenience stores. In a regular crumb cake recipe, a high-temperature oven hardens the streusel into a fragile crust. Here, the oven is powered by steam, so the topping starts off dry, almost white and powdery. As it cooks, it absorbs water from the steam and aggregates into a blanket of delicious, soft brown pebbles.

Besides the unusual topping, this recipe illustrates a technique common in the assemblage of steamed cakes. Because steaming is so efficient, a cake can built up in a series of flash-steamed layers. This recipe demonstrates the versatility of that technique. The plumped raisins float just above the bottom of the cake, although the batter itself is not sufficiently buoyant to support the raisins. The trick is a thin strip of batter poured into the pan and flash-steamed as a platform for the raisins. Similarly, the crumb topping would sink if sprinkled over the cake batter. Instead, it goes on after the body of the cake has finished steaming.

The inspiration for the flavoring is an herb called cinnamon basil. It's not available at my local markets, so I simulated the ingredient by mixing regular basil and powdered cinnamon. An accurate substitution would be a pinch of cinnamon per teaspoon of dried basil. For a crumb cake, I thought the cinnamon should be more assertive, so the flavoring is half cinnamon and half basil. The taste of basil remains distinct. Even the raisins are re-hydrated in basil-infused water.

The cake itself is a cottony-soft sponge cake, leavened with egg foam and a tiny amount of baking powder. The high ratio of cornstarch to flour is the reason for the fluffy texture. The applesauce and higher sugar content give the cake its moistness - it has double the sugar-to-egg ratio of a basic Genoise cake. The weight of that extra sugar partially collapses the egg foam, hence the need for the baking powder boost.

The instructions for beating the egg foam repeatedly state that the batter should be heated until all the sugar has been mixed in and dissolved. The recipe was formulated with an electric whisk as the mixing device. Electric whisks are not as fast or powerful as a high-speed stand mixer or even a handheld two-beater electric mixer, and the heating expedites the formation of the egg foam. If the recipe is implemented with a high-speed mixer, it may be possible to omit the heating, although I have not tried it that way.

Here are a few more tips for assisting the egg foam to maximum height:
  • Fresh baking powder - the recipe specifies only a little baking powder, so it must be fresh. Test the strength of baking powder by putting a tiny spoonful in hot or boiling water and seeing how much it fizzes.
  • Beat the egg foam a lot - even when the egg foam forms a ribbon when dripped from the beaters, it's doesn't hurt to continue beating it for a few minutes more, because the egg foam stabilizes with longer beating time.
  • Greased and floured pan - out of laziness, I don't always flour my pans. With egg foam batters, however, it's a good idea to do that always. Pans with only grease are slippery, and the batter can't grip the sides and pull itself up.
  • Rolling boil - a rolling boil means that the inside of the steamer is thick with steam and thicker steam means more heat transfer to the pan, which invigorates the air bubbles and the baking powder reaction in the batter.
  • Don't wait - if the batter begins "bubbling", steam the cake at once. Bubbling is a sign that the batter is losing air. Low temperature cakes need all the leavening power they can get to puff up.
A final thought: if the crumb topping steams up too dry, try making it with a very little more butter. It's easy to add too much butter, and then the topping could turn out soggy.

Makes 1 cake, 8 servings

- 83 calories per serving
- Oven Temperature: Steamed

Basil Infused Raisins:
  • 1/8 cup raisins
  • 1 tablespoon coarsely chopped, fresh basil (or 1 teaspoon dried basil)
  • 1/2 cup boiling water
Crumb Topping:
  • 1 tablespoon brown sugar
  • 1 tablespoon rolled or instant oats
  • 1/8 cup all-purpose flour
  • 1/2 tablespoon butter
  • 1/8 teaspoon ground cinnamon
Sponge Cake:
  • 3 tablespoons all-purpose flour (1 oz)
  • 1 tablespoon cornstarch (0.3 oz)
  • 1 teaspoon non-fat milk powder
  • 1/4 teaspoon dried basil
  • 1/4 teaspoon ground cinnamon
  • 1/4 teaspoon baking powder
  • pinch of salt
  • 1 tablespoon applesauce
  • 1 tablespoon milk (regular or low-fat)
  • 1 large egg
  • 1/4 teaspoon vanilla extract
  • 1/4 cup sugar
Basil Infused Raisins Method


1. Put basil and raisins in a heatproof cup. If using dried basil, crush it in a mortar or between fingers to release flavor. Pour in hot water and infuse for at least 30 minutes.


2. Strain and reserve raisins, discarding water and basil.

Crumb Topping Method:


1. If oat flakes are larger than 1/4 inch, pulse them in a coffee grinder or food processor for 2 or 3 seconds to chop them up a little. Put dry ingredients in a small bowl and mix until well combined. Add butter, cut into small chunks.


2. With fork, cut butter into flour mixture until topping is uniformly crumbly. Set aside.

Cake Method:


1. Cut a strip of aluminum foil 6 inches wide and at least 11 inches long. Press the foil into a small loaf pan (5-3/4 x 3 x 2 inches) to cover the bottom and the long sides. Grease and lightly flour the pan. Set aside.


2. Mix the applesauce and milk in a small dish and set aside.


3. Bring sauce pot with at least 1 inch of water to a simmer. In a large metal bowl, lightly whisk the egg, 1/8 cup of sugar and vanilla extract until frothy. Take sauce pot off heat and place bowl over sauce pot. The hot water must NOT touch the bowl. While monitoring the temperature of the egg mixture with an instant-read thermometer, gently stir the mixture until it reaches 100F/38C. Remove bowl from sauce pot.


4. With an electric whisk or mixer, whip the egg mixture on high speed until it is pale yellow and double in volume and forms a thin ribbon that lasts 2 to 3 seconds when dripped from the beater. This step should take about 3 to 5 minutes.


5. Bring the sauce pot back up to a simmer and remove from heat. Put the bowl over the sauce pot. Beat until the mixture forms a thicker ribbon that lasts at least 15 seconds when dripped from the beater. The temperature of the batter should never exceed 110°F/43°C or the heat will cook the egg foam. If the batter gets too hot, remove it from the sauce pot and continue beating as it cools. When the batter attains the thicker ribbon stage, remove the bowl from sauce pot.

The first picture above shows the thicker ribbon that remains visible for a count of 15 before completely dissolving. The second picture above shows that the batter should now be so light and thick that a small amount will mound in the beater.


6. Sprinkle in a portion of remaining sugar. Put bowl back over hot water and beat on HIGH until dissolved. At this stage, the batter should not exceed 100°F/38°C. Repeat until all remaining sugar has been mixed into the batter and remove from the sauce pot. The sugar will partially collapse the egg foam and the ribbon will only stay on the surface for about 5 seconds. Continue beating another 4 or 5 minutes on HIGH to stabilize the batter and cool.


7. Alternately, FOLD in portions of the applesauce and flour mixtures. The applesauce should be dripped along the edge of the batter. The flour should be sifted over the batter. Repeat until all the applesauce and all of the flour have been incorporated.


8. Bring steamer water to a rolling boil. Pour 1/4 cup of the batter into the loaf pan and tilt the pan to fully coat the bottom of the pan with batter. Steam the batter for 3 minutes. Remove.


9. Sprinkle basil raisins over the steamed cake base.


10. Pour the remaining batter into the cake pan over the raisins and even out. Grease the underside of a sheet of aluminum foil large enough to fit over the pan. Cover the pan with the foil and crimp the foil against the pan ledge to secure it. Put the pan in the steamer and steam for 30 minutes. Check the steamer's water level periodically; the water should be at a rolling boil.


11. Remove from steamer. Carefully remove the foil without tearing it. Sprinkle crumb topping over the cake. Re-cover the pan with the foil, crimping it loosely in place and allowing enough room so the topping does not press against the foil. Return to steamer and steam for another 15 minutes. At this stage, the water does not have to be at a rolling boil - a medium boil will suffice.


12. Remove from steamer and remove foil. Cool in pan for 15 minutes. Loosen cake from short sides with a knife and lift the cake out of the pan by grabbing and pulling up on the aluminum foil flaps. Peel off foil and cool cake on a rack for 30 minutes.


13. Slice and serve.