Wednesday, December 22, 2010

Brisa Del Mar Tamale Muffins With Lima Bean Frosting (Baked)


These muffins are basically tamale pies baked in muffin form with a center filling. They are "brisa del mar" ("sea breeze") because they have a hint of sea flavor. Although traditional tamale pie frugally extends a meat ingredient (usually beef), this recipe can be made vegetarian or vegan. The main deviations from basic tamale pie are the ground shrimp (or seaweed flakes) in the cornmeal batter, the "frosting" of pureed lima beans, and the smokey paprika, which reminds me of barbecue. Like the zong-zi wrapped rice dumplings, these muffins are just about a complete meal in one package. Once the cornmeal solidifies, they can be handled without breaking apart, and can be put in a cupcake carrier and stowed in lunchboxes (with the salsa in a separate sauce container or in packets - like the fastfood ones - instead of garnishing the frosting).

As I was developing this recipe, it occurred to me that flavoring the cornmeal with seafood would be an interesting touch, since I live in a city with a seafood waterfront. Large chunks of fish or shrimp would have been too bold, I thought. In my food bins was an unopened bag of dried ground shrimp (shrimp powder), perfect for a scent of seafood. Shrimp powder has a slightly bitter taste to it (at least my brand does), so I don't recommend loading the cornmeal heavily with shrimp powder.

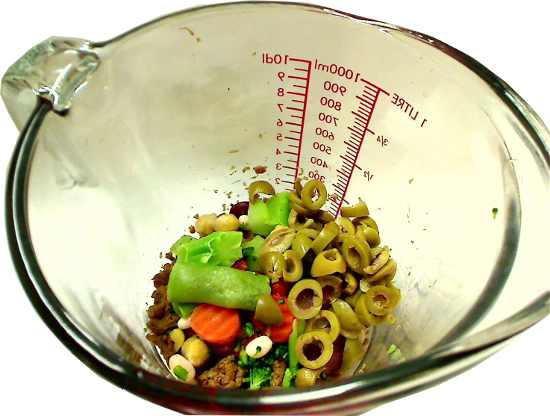
The "fiesta" frozen vegetables are a mix of carrots, broccoli, sweet peas, white beans. garbonzo beans, kidney beans, green beans and red peppers. With so many kinds of beans, I included cumin and smoked paprika in the spice mix to make the meat mixture taste more like a barbecued chili. I did try a frozen "stir-fry" mix as well (with such asian-style vegetables as water chestnuts, mung bean sprouts and snap peas), but found the asian flavors clashed with the TexMex flavors too much for my palette.

The frosting was originally supposed to be mashed potatoes, but I went with pureed lima beans when I discovered how close they were to real mashed potatoes (many of my bun and pastry fillings are based with lima bean puree). Thematically, the lima bean puree echoed the bean ingredients in the batter. The recipe makes more puree than absolutely necessary for frosting the muffins, but I like a thick layer of frosting on my tamale muffins.

For vegetarians, these muffins can be made meat-free by substituting the ground beef with crumbled veggie burgers or a prepared vegetarian textured protein (I tried the Morningstar Crumbles with great success). Instead of the shrimp powder, put in 1-1/2 to 2 teaspoons (roughly double the amount) of seaweed flakes. Seaweed flakes are available in American markets, but I made my own flakes by roughly grinding half a sheet of a sushi wrapper (sushi nori) in a spice grinder or by cutting it into confetti with a scissors. I haven't tried a vegan cheese, but there are cheddar-like vegan cheeses that melt like a dairy cheddar.

Makes 4 tamale muffins

- 130 to 190 calories per muffin (frosted with 1 tablespoon of lima bean puree)
- Oven Temperature: 250F/121C

Tamale Muffins:
  • 1/2 cup browned ground beef or vegetarian crumbles
  • 1/4 cup chopped green salad olives
  • 1/4 cup frozen "fiesta" vegetables, thawed (see text)
  • 1/8 cup chunky-style salsa
  • 1 tablespoon ketchup
  • 1/4 teaspoon salt
  • 1/2 teaspoon chili powder
  • 1/4 teaspoon smoked paprika (see text)
  • 1/8 teaspoon cumin (see text)
  • 1/4 teaspoon hot sauce
  • 1/8 cup grated cheddar cheese or other soft cheese or vegan melting cheese (see text)
  • 3/8 cup yellow cornmeal
  • 1-1/4 cup water
  • 1 teaspoon dried ground shrimp or 2 teaspoons seaweed flakes (see text)
  • 1 cup seasoned lima bean puree (see below)
Lima Bean Puree (makes about 1/2 cup)
  • 1/2 cup dried baby lima beans
  • salt and pepper to taste
Pureed Lima Beans Method:

1. Soak lima beans in water overnight.

2. Drain beans. Put in sauce pot and cover with water. Simmer for about an hour or until beans are tender.


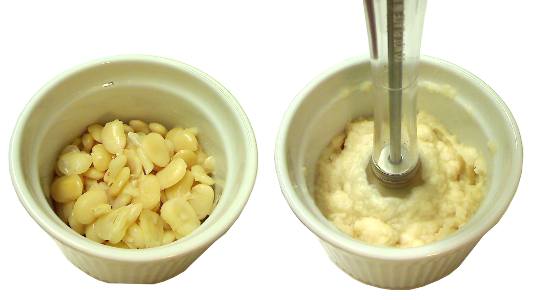
3. Drain and puree beans in a mini food processor or with an immersion blender.


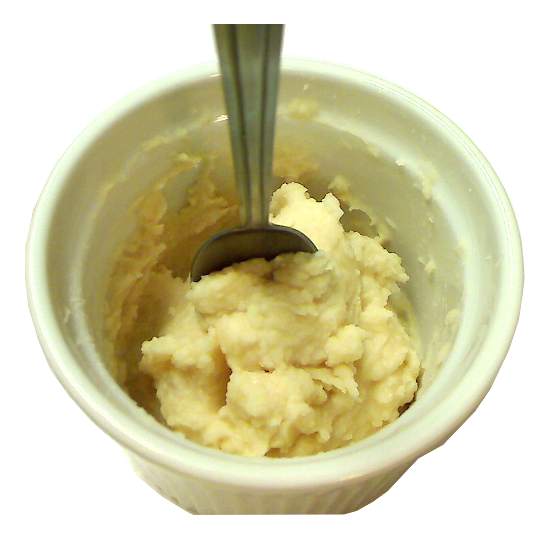
4. Season puree with salt and chili powder or pepper to taste.

Cookies Method:

Preheat oven or cooker to 250F/121C.


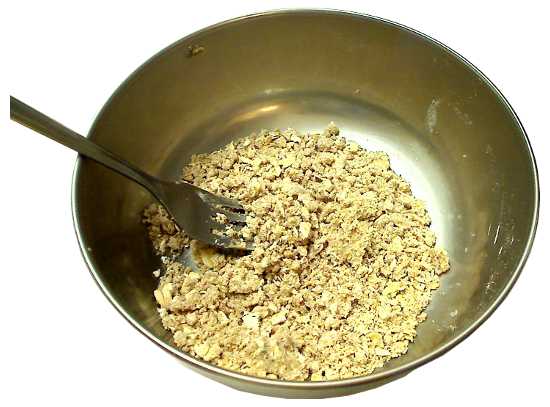
1. Mix ground beef or vegetarian crumbles, vegetables and olives in a small bowl. Gently press mixture and pour out any excess liquid.


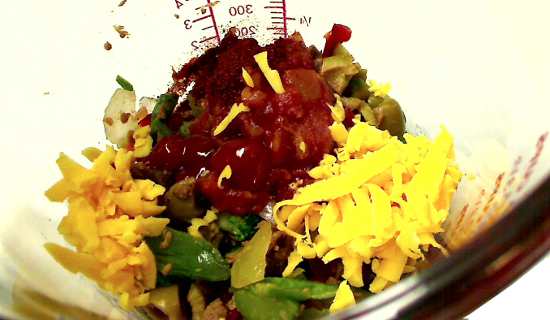
2. Add salsa, ketchup, hot sauce, spices, salt and cheese and mix. Set aside.


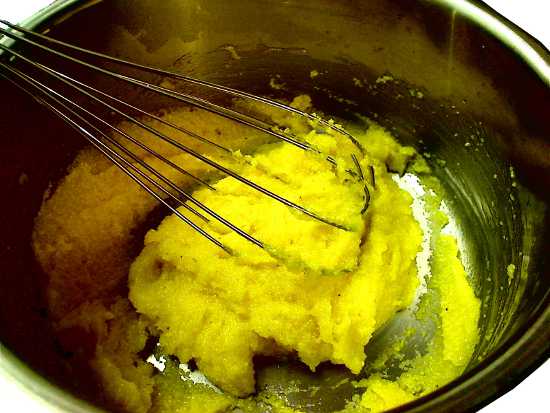
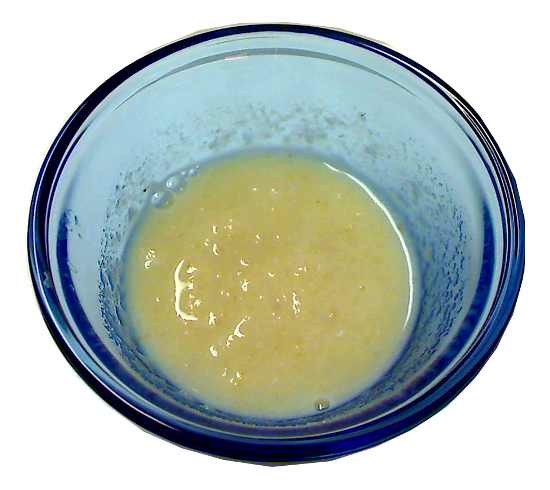
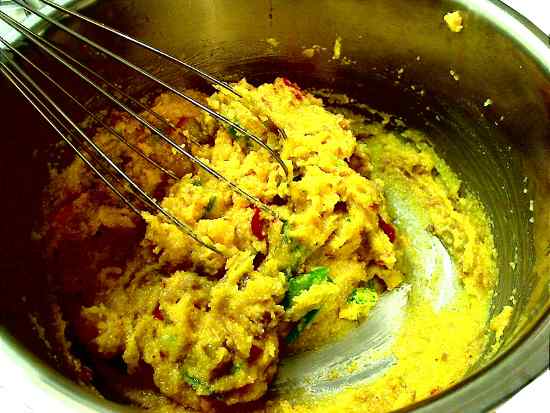
3. In a medium sauce pot, mix water, cornmeal and dried ground shrimp or seaweed flakes. On medium heat, stirring constantly with a whisk, cook the corn meal until it thickens into a paste and clears the bottom of the pot as it's stirred (usually less than 5 minutes).


4. Remove from heat. Reserving 1/4 cup of meat mixture (muffin filling), stir the remainder of the meat mixture into the cornmeal.


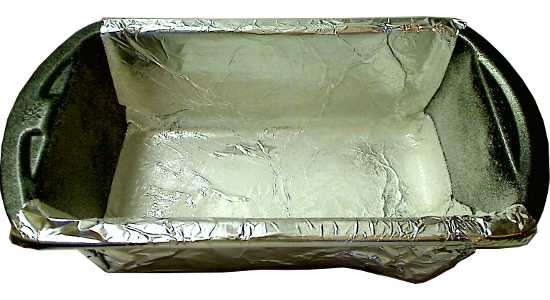
5. Grease 4 muffin molds (1/2 cup capacity). Fill each muffin mold with the cornmeal batter.


6. With a spoon, press a deep hole into the center of each muffin.


7. Put 1 tablespoon of the reserved meat mixture into the center of each muffin and press down until just below level of the mold.


8. Spread the cornmeal mixture from around the muffin to cover the fillling.


9. Optional: sprinkle the top of each muffin with grated cheese. Muffins that will be frosted with lima bean puree don't need the cheese topping, which will toughen or harden as the muffin cools.


10. Bake for 2 to 3 hours until the muffins are firm and the cheese is melted and lightly brown. Interestingly, if the muffins are refrigerated for several hours before baking, they may brown in as little as 1-1/2 hours, possibly because more water is absorbed into the cornmeal during the refrigeration. As is true of a corn pudding, the longer the muffins are baked, the more the cornmeal softens and smooths out. If baking in a cooker, place moisture absorbing paper towels under lid.

11. Remove muffins from oven and cool for at least 45 minutes. If they aren't cooled long enough, the muffins won't hold their shape when unmolded.


12. Unmold each muffin and stand upright.


13. Frost each muffin with lima bean puree. If the muffins will be served hot, reheat them in a steamer or wrap them in a wet towel and reheat in the microwave, before garnishing them with salsa in the next step.


14. Just before serving, top each muffin with a spoonful of salsa.


15. An alternative way to serve is to put the muffin in a bowl and add a serving of vegetables, salsa and lima bean puree.

Cinnamon Basil Crumb Cake (Steamed)


[ Equipment: steamer or steam oven. For more information about the terminology in this recipe, see Low Temperature Baking: A Journey of 3 Paths ].

The title of this recipe is not a typo: it's really a steamed crumb cake. Crumb cakes are usually baked in dry heat, because the topping is supposed to be dry and crumbly. On this cake, the topping is crumbly but moist, similar to those on the individually wrapped coffee cakes sold in delis and convenience stores. In a regular crumb cake recipe, a high-temperature oven hardens the streusel into a fragile crust. Here, the oven is powered by steam, so the topping starts off dry, almost white and powdery. As it cooks, it absorbs water from the steam and aggregates into a blanket of delicious, soft brown pebbles.

Besides the unusual topping, this recipe illustrates a technique common in the assemblage of steamed cakes. Because steaming is so efficient, a cake can built up in a series of flash-steamed layers. This recipe demonstrates the versatility of that technique. The plumped raisins float just above the bottom of the cake, although the batter itself is not sufficiently buoyant to support the raisins. The trick is a thin strip of batter poured into the pan and flash-steamed as a platform for the raisins. Similarly, the crumb topping would sink if sprinkled over the cake batter. Instead, it goes on after the body of the cake has finished steaming.

The inspiration for the flavoring is an herb called cinnamon basil. It's not available at my local markets, so I simulated the ingredient by mixing regular basil and powdered cinnamon. An accurate substitution would be a pinch of cinnamon per teaspoon of dried basil. For a crumb cake, I thought the cinnamon should be more assertive, so the flavoring is half cinnamon and half basil. The taste of basil remains distinct. Even the raisins are re-hydrated in basil-infused water.

The cake itself is a cottony-soft sponge cake, leavened with egg foam and a tiny amount of baking powder. The high ratio of cornstarch to flour is the reason for the fluffy texture. The applesauce and higher sugar content give the cake its moistness - it has double the sugar-to-egg ratio of a basic Genoise cake. The weight of that extra sugar partially collapses the egg foam, hence the need for the baking powder boost.

The instructions for beating the egg foam repeatedly state that the batter should be heated until all the sugar has been mixed in and dissolved. The recipe was formulated with an electric whisk as the mixing device. Electric whisks are not as fast or powerful as a high-speed stand mixer or even a handheld two-beater electric mixer, and the heating expedites the formation of the egg foam. If the recipe is implemented with a high-speed mixer, it may be possible to omit the heating, although I have not tried it that way.

Here are a few more tips for assisting the egg foam to maximum height:
  • Fresh baking powder - the recipe specifies only a little baking powder, so it must be fresh. Test the strength of baking powder by putting a tiny spoonful in hot or boiling water and seeing how much it fizzes.
  • Beat the egg foam a lot - even when the egg foam forms a ribbon when dripped from the beaters, it's doesn't hurt to continue beating it for a few minutes more, because the egg foam stabilizes with longer beating time.
  • Greased and floured pan - out of laziness, I don't always flour my pans. With egg foam batters, however, it's a good idea to do that always. Pans with only grease are slippery, and the batter can't grip the sides and pull itself up.
  • Rolling boil - a rolling boil means that the inside of the steamer is thick with steam and thicker steam means more heat transfer to the pan, which invigorates the air bubbles and the baking powder reaction in the batter.
  • Don't wait - if the batter begins "bubbling", steam the cake at once. Bubbling is a sign that the batter is losing air. Low temperature cakes need all the leavening power they can get to puff up.
A final thought: if the crumb topping steams up too dry, try making it with a very little more butter. It's easy to add too much butter, and then the topping could turn out soggy.

Makes 1 cake, 8 servings

- 83 calories per serving
- Oven Temperature: Steamed

Basil Infused Raisins:
  • 1/8 cup raisins
  • 1 tablespoon coarsely chopped, fresh basil (or 1 teaspoon dried basil)
  • 1/2 cup boiling water
Crumb Topping:
  • 1 tablespoon brown sugar
  • 1 tablespoon rolled or instant oats
  • 1/8 cup all-purpose flour
  • 1/2 tablespoon butter
  • 1/8 teaspoon ground cinnamon
Sponge Cake:
  • 3 tablespoons all-purpose flour (1 oz)
  • 1 tablespoon cornstarch (0.3 oz)
  • 1 teaspoon non-fat milk powder
  • 1/4 teaspoon dried basil
  • 1/4 teaspoon ground cinnamon
  • 1/4 teaspoon baking powder
  • pinch of salt
  • 1 tablespoon applesauce
  • 1 tablespoon milk (regular or low-fat)
  • 1 large egg
  • 1/4 teaspoon vanilla extract
  • 1/4 cup sugar
Basil Infused Raisins Method


1. Put basil and raisins in a heatproof cup. If using dried basil, crush it in a mortar or between fingers to release flavor. Pour in hot water and infuse for at least 30 minutes.


2. Strain and reserve raisins, discarding water and basil.

Crumb Topping Method:


1. If oat flakes are larger than 1/4 inch, pulse them in a coffee grinder or food processor for 2 or 3 seconds to chop them up a little. Put dry ingredients in a small bowl and mix until well combined. Add butter, cut into small chunks.


2. With fork, cut butter into flour mixture until topping is uniformly crumbly. Set aside.

Cake Method:


1. Cut a strip of aluminum foil 6 inches wide and at least 11 inches long. Press the foil into a small loaf pan (5-3/4 x 3 x 2 inches) to cover the bottom and the long sides. Grease and lightly flour the pan. Set aside.


2. Mix the applesauce and milk in a small dish and set aside.


3. Bring sauce pot with at least 1 inch of water to a simmer. In a large metal bowl, lightly whisk the egg, 1/8 cup of sugar and vanilla extract until frothy. Take sauce pot off heat and place bowl over sauce pot. The hot water must NOT touch the bowl. While monitoring the temperature of the egg mixture with an instant-read thermometer, gently stir the mixture until it reaches 100F/38C. Remove bowl from sauce pot.


4. With an electric whisk or mixer, whip the egg mixture on high speed until it is pale yellow and double in volume and forms a thin ribbon that lasts 2 to 3 seconds when dripped from the beater. This step should take about 3 to 5 minutes.


5. Bring the sauce pot back up to a simmer and remove from heat. Put the bowl over the sauce pot. Beat until the mixture forms a thicker ribbon that lasts at least 15 seconds when dripped from the beater. The temperature of the batter should never exceed 110°F/43°C or the heat will cook the egg foam. If the batter gets too hot, remove it from the sauce pot and continue beating as it cools. When the batter attains the thicker ribbon stage, remove the bowl from sauce pot.

The first picture above shows the thicker ribbon that remains visible for a count of 15 before completely dissolving. The second picture above shows that the batter should now be so light and thick that a small amount will mound in the beater.


6. Sprinkle in a portion of remaining sugar. Put bowl back over hot water and beat on HIGH until dissolved. At this stage, the batter should not exceed 100°F/38°C. Repeat until all remaining sugar has been mixed into the batter and remove from the sauce pot. The sugar will partially collapse the egg foam and the ribbon will only stay on the surface for about 5 seconds. Continue beating another 4 or 5 minutes on HIGH to stabilize the batter and cool.


7. Alternately, FOLD in portions of the applesauce and flour mixtures. The applesauce should be dripped along the edge of the batter. The flour should be sifted over the batter. Repeat until all the applesauce and all of the flour have been incorporated.


8. Bring steamer water to a rolling boil. Pour 1/4 cup of the batter into the loaf pan and tilt the pan to fully coat the bottom of the pan with batter. Steam the batter for 3 minutes. Remove.


9. Sprinkle basil raisins over the steamed cake base.


10. Pour the remaining batter into the cake pan over the raisins and even out. Grease the underside of a sheet of aluminum foil large enough to fit over the pan. Cover the pan with the foil and crimp the foil against the pan ledge to secure it. Put the pan in the steamer and steam for 30 minutes. Check the steamer's water level periodically; the water should be at a rolling boil.


11. Remove from steamer. Carefully remove the foil without tearing it. Sprinkle crumb topping over the cake. Re-cover the pan with the foil, crimping it loosely in place and allowing enough room so the topping does not press against the foil. Return to steamer and steam for another 15 minutes. At this stage, the water does not have to be at a rolling boil - a medium boil will suffice.


12. Remove from steamer and remove foil. Cool in pan for 15 minutes. Loosen cake from short sides with a knife and lift the cake out of the pan by grabbing and pulling up on the aluminum foil flaps. Peel off foil and cool cake on a rack for 30 minutes.


13. Slice and serve.

Friday, October 29, 2010

Slow-Rise, Kneaded White Sandwich Bread: Basic & Water-Roux (Baked)


[ Equipment: slow cooker or oven. For more information about the terminology in this recipe, see Low Temperature Baking: A Journey of 3 Paths ].

These loaves make excellent sandwiches. The 2 versions differ in the crispness of the crust and the texture. The plain bread has the crispier crust and a firmer, more closed crumb. The water roux loaf is softer, chewier, fluffier, with a more open crumb. Both are tasty straight out of the oven (the roux loaf has an almost creamy taste despite the lack of dairy) and compare well with loaves baked at high temperatures.

Like my previous loaves, these breads are slow rise, but are relatively easy to make and bake at a single temperature, not in a rising or falling oven. They are "real" loaves. Each one weighs almost 1 lb. (14 oz./400 gr.) and measures 8 x 4 x 2-1/4 (inches), which is adequately large to qualify as a true sandwich loaf. Although the incorporation of a water roux in one loaf is supposed to extend freshness, both breads are best eaten on the same day they're baked. After that time, slices can be revived with a quick steaming or a light toasting.

These seemingly simple recipes have spent several months in research and testing, but all the effort has been worth it because the techniques will be applied to baking other types of breads at low temperature. I began work on them a few days after I posted the White Bread-Mini Loaf recipe. I ate the last slices of a sandwich bread from the local market. Rather than buy a new loaf, I decided it was time to try baking my own.

To be a successful sandwich loaf for me on all fronts, it had to be tasty with and without toasting. My first focaccia bread was a dry, coarse bread that bloomed in flavor only when briefly toasted. Although the mini loaf had better texture, the recipe and technique didn't scale well (the "enlarged" loaf had a dry and tough crumb), and was a little complicated for an everyday bread. A loaf also had to be of adequate size. The mini loaf was fine for bite-size sandwiches, but the entire loaf could be eaten in minutes. The size of my oven limited the maximum size of the loaf. All of my LTB ovens were converted slow cookers, and the biggest one was a 5.5-quart, which could accommodate an 8 x 4 x 2-3/8 (inch) loaf pan. While that wouldn't be the largest loaf of bread around, it would do.

A review of my earlier recipes suggested that the bread grain had gelatinized from excessive exposure to high moisture and heat, resulting in the hard, coarse texture. I broke the problem down into 2 parts: too much moisture and too much oven time. One way to counter those conditions would be to start baking the loaf at 250°F (as opposed to steaming it first as I did in my mini-loaf) to heat up the dough quickly and begin cooking the interior sooner. However, the higher heat alone could overbake the bread near the sides of the pan, which could dry out rock hard. There was also the matter of even browning. Large loaves tend to brown very, very slowly on their top surfaces than on the sides. My second fix was be to borrow an idea from commercial bakeries and lid the pan with foil for a pullman-style loaf. Commercial pullman loaves brown evenly on all sides, because all surfaces of the dough touch hot metal.


The picture above shows my first pullman-style loaf. Note the flat top due to the dough pressing against the foil. The top is a light golden brown, but the sides are an over-baked dark brown. The texture of the bread was still coarse, though more elastic than some of my earlier breads. To shave off more oven time, I cut the liquid-to-flour ratio just to the amount of water necessary to make a stiff, but kneadable dough. In breadmaking terminology, the hydration level was around 60%, which is at the low end of the range for good bread. To facilitate the release of steam in a controlled manner and further help soften the texture, I perforated the foil with a wood skewer. It was trial and error to determine the best baking time and the number of holes in the foil. I checked off the internal temperatures of the best loaves for future reference.

With these corrections implemented, the basic white loaf developed an even crust, light golden toned and thinly crispy. The interior was hearty but not dry, a fine sandwich bread. I was almost ready to post the recipe when I began reading about bread made with a water roux as a means to extend the freshness. The basic loaves I made were best eaten as soon as they were cooled and ready for slicing. One day later, the texture was distinctly less moist. Two days later, I wanted to either toast the slices or revive them by steaming.

In a water roux bread, a flour-water mixture is heated until it thickens but is not fully cooked. The process binds water to the flour in a paste, which is mixed into the main dough and releases vapor very slowly during baking compared to the non-roux portions of the dough. My recipe for the roux paste was 1 part flour to 2 parts water, and the flour in the roux is borrowed from the total amount of flour for the loaf. It was trial and error to determine how much of the flour should be converted to roux. Too much roux gelatinizes the texture. Too little roux is in vain. I found that a roux comprised of 7% of the total amount of flour worked very well.


The above picture shows a loaf incorporating a water roux. The same view of a basic loaf at the beginning of this recipe highlights the less substantial crust of the roux bread. The roux crust is also not as brown, although the lighting makes that more difficult to distinguish. None of this is surprising as the water retention of the roux inhibits browning and crisping.


The higher moisture retention of the roux dough, however, produces a wonderfully soft bread, like a supermarket Wonder Bread, but with more body, more toothiness, more flavor and a subtle creaminess. The picture above compares slices from the two loaves. The top plate shows the basic loaf and the bottom plate is the roux bread. Note the fluffier texture and more open crumb of the roux bread.

Although the roux dough did produce a fluffier loaf, I can't really say it extended the "freshness". As with the basic loaf, the texture of the roux loaf noticeably degraded after the first day, although the former dried out faster overall. Nevertheless, for the texture alone, the roux bread is my favorite, and I don't mind the extra trouble to make it. As I said before, a little steam successfully revives both breads, so the extra effort to prepare the roux is totally worth it for me.

Because the hydration level is important, I have given weight measurements for the flour. The basic and roux breads both contain 1-3/4 cups of flour. The total weights of the flour in the 2 breads don't quite match up. Those numbers are actual amounts from particular loaves. The 0.5 oz difference is not significant in this recipe.

These breads were tested only with rapid rise yeast. Active dry yeast should work fine, but maybe not as fast. With active dry yeast, the first rise could be extended up to 24 hours. Because the dough's hydration is very low, proofing active dry yeast in the warm water first could encourage reanimation.

Makes 1 loaf
- 820 calories per loaf
- Oven Temperature: 250°F/121°C

Basic Bread:
  • 1-3/4 cup all-purpose flour (9.7 oz)
  • 3/4 cup warm water
  • 1-1/2 teaspoon sugar
  • 1/2 teaspoon salt
  • 1/8 teaspoon rapid-rise yeast (see text)
Water Roux Bread:
  • 1-5/8 cup all-purpose flour (8.5 oz)
  • 1/4 cup water roux paste (see below)
  • 1/2 cup warm water
  • 1-1/2 teaspoon sugar
  • 1/2 teaspoon salt
  • 1/8 teaspoon rapid-rise yeast (see text)
Water Roux:
  • 1/4 cup water (2.1 oz)
  • 1/8 cup all-purpose flour (0.7 oz)
Water Roux Paste Method:


Note: the water-flour mixture must be heated until it's about the consistency of thick honey and congeals on the tines if scooped up by a fork. My thermometers were not designed to function in such a small amount of material, but I got readings between 140°F and 150°F. During the heating, small, soft lumps that form, but dissolve when whisked with a fork are fine, but if there are solid bits of cooked dough, the roux is ruined and should be started again.

Do not overcook the roux. An overcooked roux will slow or even prevent the dough from rising. With a microwave (mine is rated at 800W), set the power to MEDIUM or put a cup of water next to the water-flour mixture to absorb some of the heat power. On the stovetop, the flame should be set to low.

1. For the microwave: thoroughly mix the water and flour in a small microwave-safe bowl.

For the stovetop: thoroughly mix the water and flour in a small fry pan or saucepan.


2. In the microwave: heat the water-flour mixture for 10 to 15 seconds, remove and stir with a fork to dissolve any lumps. Repeat this step until the roux reaches the consistency of honey and congeals on the tines if scooped up with a fork (between 1 to 2 minutes total heating time in my microwave).

On the stovetop: heat the roux in a saucepan, stirring constantly. Check the consistency by taking the roux off heat and scooping it up with a fork as above.

Move the roux paste into a small bowl and let cool.

Bread Method:


1. Mix flour, salt and yeast in a bowl until well combined. Add roux paste (for roux bread only).


2. Add half of the warm water and mix. Then add the remainder of water a little at a time to form a STIFF but kneadable dough. If the dough is too wet, knead in more flour to compensate. If the dough is too dry, add a little more water to loosen it. I almost always have some water left over: usually about 1 tablespoon left over for the roux bread and up to 2 tablespoons left over for the basic bread.


3. Knead for 3 to 5 minutes until dough is smooth and elastic. I knead with the taffy-pull method: hold the dough in both hands, stretch, fold back and repeat until the dough can stretch for about 12 inches without breaking. With larger and heavier doughs, it can be a workout, but it's fast and effective. Do NOT overknead.


4. Put the dough back into bowl and cover. In the picture, I rise the dough in a plastic bowl with straight sides. I shaped the dough into a flat disk that fits the bottom of the bowl to make it easier to monitor the dough height.


5. Let rise in a warm place for 12 to 18 hours or until double in height. With rapid rise yeast, the double height could be reached in less than 12 hours, but I recommend continuing the ferment for at least 12 hours to develop flavor. Do not let it rise for more than 18 hours in any case, as over-fermenting may cause the dough to collapse or inhibit the second rise.


6. Grease an 8" x 4" x 2-3/8" loaf pan. Grease the shiny side of a sheet of aluminum foil large enough to cover the pan. Cover the top of the pan with the foil (the shiny side facing down) and lightly press it under the pan edge to hold it stretched in place temporarily. With a wood skewer (1/8-inch diameter), puncture the foil along the inside perimeter of the pan, the holes spaced about 1/2 to 1 inch. Then puncture the foil in 3 rows evenly spaced inside the perimeter, with the same hole spacing.


7. Shape dough into a log and place in pan. Cover and let rise in a warm place until the dough is almost to the top - about 2 to 3 hours.


8. Cover the pan with the aluminum foil, aligning the holes, stretching it taut, and pressing the foil into pan ledge to secure it. Then tightly wrap the top of the pan with twine just under the ledge and knot. Push and crimp the foil up against the twine and prevent it from slipping down.

Let dough continue rising until it presses against the foil and causes it to bulge outwards (about 1 hour).


9. Bake at 250°F/121°C for 60 minutes. To check for doneness, insert a digital probe thermometer through the foil and into the center of the loaf. If the loaf is ready, the internal temperature should be about 205°F/96°C.


10. Remove foil. Cool the loaf in the pan for about 15 minutes. Then unmold and continue cooling on a rack.

11. Slice and serve.