
This article documents how I modified a Black & Decker CBM210 burr-mill grinder to be an acceptable flour mill. When I began baking gluten-free and low-carb recipes, I knew I would have to grind some of my own flours. The only grinding apparatus I owned were an immersion blender and a rotary blade coffee grinder. Neither could produce fine quality flour in large quantities. I wasn't prepared to invest in a flour mill, but I had heard that less-expensive burr-mill coffee grinders could produce flour fine enough for baking. Locally, the only affordable burr-mill grinder was the Black & Decker CBM210 (the CBM220 - identical in appearance - adds automatic features). It retailed for about $30 and had been on sale for as low as $20 (cheaper than the smaller CBM205).
I purchased a 210 without reading any reviews online and later found out that this model is notorious for inconsistently grinding coffee beans (coarse grounds mixed with fine powder on all settings). My 210 performed no better, the gritty flour submitted to the grinder multiple times before I could consider it marginally acceptable. For me, there was no alternative. It was grind flour with the 210 or limit myself to commercial flours sold in my local markets. In the product page at Amazon.com, several reviews described how to shim the 210 to push the grinding wheels closer together for a finer, more consistent grind.

Inside the 210, one section of the grinding assembly (that center knob inside the hopper) can be removed and taken part to separate the grinding wheel. Those Amazon reviewers cut a shim from card stock (such as a business card) or thin plastic (such as a yogurt cup lid). They inserted the shim under the grinding wheel and reassembled it. The mod transformed the 210 from a throw-away to a functional burr-mill grinder, they said.

Because I wash the grinding assembly after making flour, I didn't want a shim cut out from card stock. Although I had several types of flat sheet plastic from which I could cut a shim (blister packs, old library cards, document protectors), most of them were too thick. I chose the lid from a storage container for my silicone cupcake molds. That lid was molded from a very thin, flexible, clear plastic. I don't know the exact thickness, but I believe that it was about the same or actually a little thinner than the average paper-based business card. It's better to err on the side of caution in the selection of the shim material. If the plastic is too thick, the shim could press the wheels hard against each other, completely stripping the burrs and ruining them.

The picture above shows the grinding assembly before and after modification. Before the shim mod, the wheel on the left is slightly worn along the top edge from making a batch or two of flour. The wear indicates that the wheel isn't true or flat. On close examination of the grinding assembly, the wheel can be seen to sit off-kilter in the assembly due to poor manufacturing tolerances. On the right, with the shim in place and after grinding a batch of flour, the wear pattern has grown in a dramatic arc, streaking along half the circumference of the wheel. Despite the increased wear, the mod does work. My grinder now produces a finer, more consistently textured flour. The flour is still grittier than a commercial flour. A second shim might produce an even finer texture but risk ruining the grinding wheel altogether.
Of course, this mod voids the warranty. I recommend it only if the grinder would otherwise be tossed in the garbage. The increased wear on the wheel means that it will have to be replaced sooner. The mod applies to the CBM210, but I have read that the CBM220 is identical except for the inclusion of automatic features that won't be affected by the mod.
The 210 and 220 have been available since 2008 at least, and could be discontinued at any time. Thus, an article about the shim mod might, in the long term, have only limited value, and I thought about whether to write it at all. I did write it first for the owners of these machines and second in case the performance of other similar grinders might benefit from this kind of shim mod.
The Modification

1. Remove the grinding assembly from the hopper by twisting the knob to the right until it releases. See the CBM210/220 manual for more instructions about this procedure.
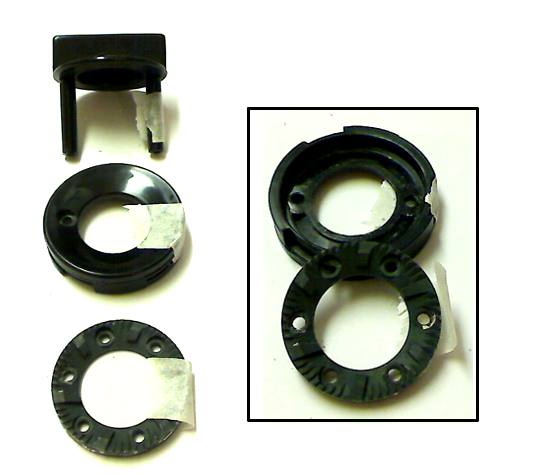
2. Remove the two screws underneath the grinding assembly. Mark the screws and the orientation of the parts so that they can be reassembled in the original order. I put a strip of masking tape on the parts to mark the orientation. The inset shows the inside of the retainer that holds the wheel.
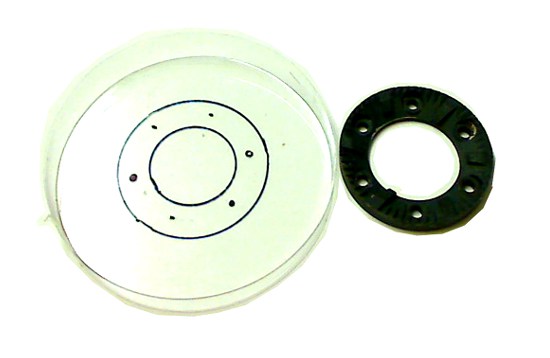
3. With a marker that writes on plastic, trace the outside and inside circumference of the wheel into the plastic. Also mark the positions of the screw holes.

4. With a craft knife, cut out the center hole.
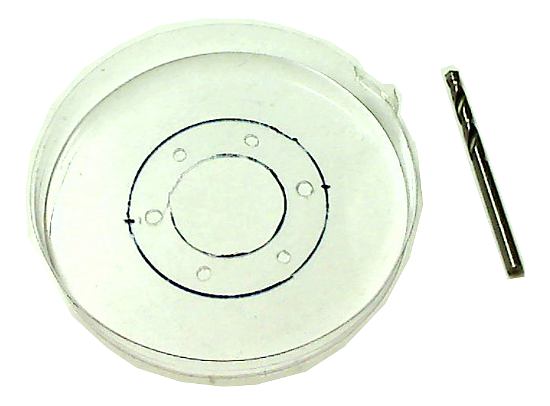
5. With a craft drill installed with a 1/8-inch bit, drill out the screw holes. Only 2 screws attach the wheel to the grinding assembly. I drilled the extra holes for ventilation and draining when the assembly is rinsed under the faucet. Without those extra holes, water could build up behind the wheel.

6. With scissors, finish cutting out the shim along the outside circumference. Test fit the shim in the retainer and trim off any plastic as necessary. If either screw hole isn't perfectly centered, GENTLY reform it by using the drill as a reamer.

7. Reassemble the grinding assembly with the new shim under the wheel. Do not tighten the screws excessively. The mod is now complete. Test grind a small batch of flour (or espresso if the machine is a dedicated coffee grinder) on the finest setting and check the wheel for any excessive wear.

thanks for the tip. gotta love thinking minds. cheers
ReplyDelete